January’s Garden Update

January 28, 2013


Today, I take a brief respite from wheels and spinning and wool and knitting to revisit an earlier love. My gardens. I achieved a fairly large goal I had set for myself; I have something blooming in my garden 12 months out of the year.

I didn’t get as much work on wheel restoration, or on knitting, done in 2012 because I doing a fairly complete overhaul of the gardens. I had several visions of what I wanted and realized that, not getting any younger, if I didn’t focus on the gardens in 2012 I probably would never get around to what I wanted.

The overhaul included the laying of much rock. Somewhere, one of my long-past Irish ancestors is probably slapping their knee and thinking “here’s a chip off the old stonewall-setting block.” There was also much planting. MUCH planting. So far, the majority seem to be making it through the winter and promise some wonderful photo ops throughout the year.

On this day of snow and sleet, the witch hazels are blooming:

witch hazel 1

This was the first witch hazel I’d ever put in, going back almost ten years. It is supposed to be “Jelena” but I think it was mislabeled, as Jelena is a bright coppery orange and this clearly is reddish. It had been in the front garden where it was largely unnoticed, but when I set the raised stone bed in the back yard, I moved this to be in front of the slate.

january 2013 065

That is a “Janet Blair” rhody right behind and I’m hoping for some nice blooms, given the size of the buds. I like witch hazels because they always remind me of little bursts of fireworks:

witch hazel 3

The Jelena bloomed very well in its new spot. Its former spot is now occupied by another witch hazel, but one with showier blooms, “Barmstedt’s Gold:”

witch hazel 4

Barmstedt’s Gold shows up much better against the evergreen foliage of a spring-blooming camelia (and note the HUGE bud on the camelia, if the squirrels don’t get them!). Also, even though it doesn’t show in the photos, the Barmstedt’s is behind a sango kaku, a type of Japanese maple with coral-colored bark. I’m hoping the Barmstedt’s will fill out and provide a yellow backdrop to the red bark during late winter.

witch hazel 5

The Barmstedt’s is just opening up; while the reddish on is pretty much full bloomed. Plenty of buds to come on the Barmstedt’s, through:

witch hazel 6

And despite the snow, the sleet, the freezing rain, the garden is now full of promise for the spring to come:

witch hazel 7


Remembering Summer …

January 24, 2013


On a night when it is almost unthinkably cold for around here (going down to 8 Fahrenheit!), I revisited some photos of the summer and found these . This is just a little feather and fan scarf I knitted out of my handspun yarn.

fan scarf 1

I was glad to see my hydrangeas in the background, and the birch tree that survived Hurricane Sandy, although the white trellis had to be tossed in the garage to save it from the wind.


fac scarf 2

I like seeing vibrant colors against a green and sunny background on this freezing cold night.

fan scarf 3

The scarf went for a Christmas gift to someone who adored the colors. I hope it is keeping them warm these more than chilly days!


Spinning Wheel Flyers and What to Look For (or Not)

January 19, 2013

This is one of an occasional series on evaluating an antique or vintage spinning wheel. Whether you are the buyer or the seller, you need to know what to look for when dealing with one of these babies. They can be excellent options over a newly-manufactured wheel, if you know what you are looking at.

We discussed flyers in a previous post, but as this is probably the main working part of a wheel, want to delve a little deeper into the topic. This is an example of an antique flyer in excellent shape:

flyer 2

This, unfortunately, is not:

vezina flyer 01

These are both flyers from Canadian Production Wheels. The upper flyer is a probable Bordua, the lower is one of the Vezina family. The Vezina wheel is dated from the 1870s, so this flyer has been around somewhat longer than the one above it, hence the additional wear. While you could still spin on it to some very little extent, it is an accident waiting to happen.

The flyer hooks are all a potential tetanus hazard:

vezina flyer 02

If the rest of the flyer was in good shape, all these hooks, on this arm and the other, would need to be pulled and replaced.

The bobbin and whorl also showed signs of being dropped, or being dropped on:

vezina flyer 05

Not fatal flaws, but not perfect specimens. And the chip in the bobbin could interfere with the amount of yarn spun on.

The most glaring deficiency is the functional repair holding the arms of the flyer together:

vezina flyer 03

And the other side:

vezina flyer other side 04

Functional repairs are a part of the piece’s history. This wheel, which is an excellent spinner, was obviously well-used by someone who wanted to keep it going. But eventually, most repaired areas give up the ghost and that is exactly what happened with this flyer. It had been lashed together for who-knows-how-long but when the whorl and bobbin were removed, the spine would drop out of the flyer base. If the spine is loose enough to turn by itself and does not turn the flyer, the wheel will not spin yarn.

The saving grace here is that the original spine is available to use as the basis for a new flyer, and that is exactly where this flyer was packed off to. It is currently in the hands of a wheel restoration expert who is building a new flyer that will use the existing spine, bobbin, and whorl. This is not as expensive as having a missing flyer assembly built from scratch, but it still is an added expense over the original cost of the wheel.

If you are buying a wheel with a flyer in similar condition, you need to calculate the cost of a rebuilt flyer against the asking price. If you are selling a wheel with a flyer in similar condition, you also need to calculate what someone will need to spend to bring the wheel back to working condition so you don’t overprice the piece.


Forester from Wicked Woollens

December 31, 2012


I have emerged from my sea of spinning wheels to make one last post for 2012. Personally, I will be rather glad to see 2012 belong to the ages as it was not the best year I’ve ever had. Yes, I did rescue a team of mules from slaughter and yes, I did rescue a horde of spinning wheels and circular sock knitting machines. But I also saw more doctors in this one year than I have for the past 30 besides spending 11 days with no power. I’m ready for 2013.

I did get quite a bit of knitting done, being without power for 11 days. Mostly Christmas gifts. However, one was a project that was a long time in coming and which only finished up a few days ago.

There is a marvelous Welsh designer named Sally Pointer who publishes under the “Wicked Woolens” banner. You can find her patterns on Ravelry. Her designs are based on nature and on history. I have a previous blog post on her “Russula” cap.

Another of her designs captured my imagination: the Forester cap. Forget that at the time I started it, I had little to no experience with lace knitting. Nor did I like to work with small, fiddly needles. Or be able to read a chart. However, Sally’s charts are very clear and very simple to follow, even for a novice. I got over the needle thing, although it did contribute to the 10 months or so it took to complete this. Cast on with a size 2 and switch over to a size 3? Really? I felt for a time like i was  knitting with long toothpicks.

However, once I started this, I did several other small projects with tiny needles, so by the time I came back to this, the needles didn’t seem fiddly at all. I wish, however, I had knitted the ribbed edging a bit longer, but at the time, I’d had quite enough of no. 2 needles! Leaving the ribbing short allowed the tensioning of the cable to pull up and cause a slightly scalloped edge, which wasn’t a bad thing.

The yarn proved in the very end to be a bit disappointing. It is Filatura di Crosa’s Golden Line Alpaca which is 40% alpaca, 35% merino wool and 25% acrylic. I am not a big alpaca fan, but I loved the color of this for this project because it is not a solid green; it is shot through with tinges of gold and orange and looked, well, leafy. However, when I wet-finished the hat, any spring the yarn had went out of it and the resulting hat, while it has a lovely hand, is a bit limper than I would like. All-wool would have held up better.

All in all, this was a good learning experience for me and a positive project to end the year with.

Here is hat on my typical “modeling stand” stone:

forestry hat 1

Here it is with its natural comparison: do you see the evergreen tree in the design?

forestry hat 2

Front the top, looking down at where everything comes together;

forestry hat 3

And on my wooden hat form so you can see what it looks like filled out:

forestry hat 4


More On Replacing Flyers

August 6, 2012


 In keeping with the current theme of restoring old wheels and replacing flyers, today’s post is reprinted with permission from a post made on Ravelry. The poster is someone who restores antique spinning wheels and who has similiar views to mine on the issues of replacing flyers. He writes:

“See here’s the thing – people ask for spare flyers and bobbins, without realizing how scarce, and non-interchangeable these parts are. For the dozens of CPWs I’ve worked on, and many of the Saxonies as well, I’ve discovered that each maker had their own particular size and shape of flyer, and each bobbin was engineered to work with that particular flyer. Some of the more “popular” common makers (like the Bordua group) made pieces that were interchnageable (they had to, since they were advertising replacement parts) but for the older makers especially, each bobbin was fitted to each flyer. So – even if there were a box of flyers under the bench (and there isn’t – only parts) it’s very unlikely that any one would fit.

The second point – and the more important one – is that the spindle is the most vital part of all. It has to be the right length, (so it fits between the maidens) and in the case of a CPW it has to have the left-hand thread at the correct point, since that’s where the whorl sits, and the whorl has to line up with the wheel, and the bobbin has to fit correctly between the whorl and the flyer… you get my point. I have maybe three spare spindles at the moment, and I’ve been scrounging for three years. I never see them. I never see flyers for that matter, which is why it’s so difficult (and expensive) to replace a flyer/bobbin assembly for a CPW. (Like $200.00 and up). If you see any lying around at a flea market, (cracked/chipped/broken or not) grab them. They’re not making them anymore.

In March, I had a machinist friend give me an estimate for reproducing a Cadorette spindle. He said $45.00 – for a 9” spindle, with some step turnings, orifice and threading. It’s a complicated piece of work, requiring a number of lathe and drill settings – and there was no reduction in price for ordering by the dozen.

When you ask (very nicely, I must allow) “Oh do you have a flyer/bobbin for a (fill in the blank) wheel?” – my answer is “I wish”.

IF there’s at least a spindle on the wheel (and it fits) then we have a chance, even if the flyer is mangled and the bobbins missing.

No spindle? It’s going to be very difficult to match.

Now – maybe somebody out there HAS a box of spindles/flyers (like a recent post from Abbotsford). Grab ‘em – and send us the bill. Any of us in the repair line will gladly take them off your hands. (Or am I being too generous with other people’s money?)

And there’s my point exactly. Don’t buy a wheel for a low price because it “needs a little work” – if that involves a missing flyer you have probably added a minimum of $250.00 to the cost of getting the wheel running.

I guess my desire in restoring wheels is exactly that – restoration. Getting the wheel close to what it originally looked like – which means finding or making a replacement part that it suitable for that particular wheel (think of a Bordua flyer on a Bisson wheel – to the uninitiated, it might work fine, but for those of us who know and love M. Bisson’s work, it’s a travesty). And if it means doing the work with hand tools and single point threading (thank god for a treadle operated Murray machine lathe) as opposed to buying something out of Home depot and bodging it together, then that’s what needs to be done. ( and when you work it out, you’re getting $3.50 an hour!).

Getting a wheel to work again is only half of the reason we do this. I keep reminding myself – how is someone going to judge your work 50 years from now?”


An Auction Haul

July 29, 2012


Evaluating the Flyer

July 24, 2012

The flyer shown below is the flyer from the American -made Saxony wheel shown in the previous post. This is the close-up view:

This flyer is in good to excellent condition. It is not pristine. It does have some issues. If a spinner were going to be spinning on this flyer for any length of time, it should be replaced and here is the main reason:

Note the large chunk missing from the neck of the flyer. Over time, the flyer shaft will loosen and probably break loose. If the flyer spins freely around the shaft, it is useless. Many flyers show sign of functional repairs but be advised: the flyer spins at extremely high rates of speed. A flyer that breaks while spinning can produce a projectile with enough force behind it to dent standard wallboard. If you know you will be doing a great deal of spinning (more than just casually now and then), do yourself a favor and replace the flyer.

The flyer arms on this piece are sturdy and do not show signs of repair. The hooks on one side are in good repair:

However, on the other arm, they need to be replaced:

Replacing the hooks could be tricky, as a split is starting at the top of the arm.

The whorl is the wooden disk screwed onto the flyer shaft above the bobbin. DO NOT ever force the whorl to unscrew! A few drops of WD40 left to sit for a half-hour will typically loosen up a stubborn whorl. Also, they usually unscrew in the opposite direction of modern screw turns. Forcing a whorl could collapse its rims.

Not sure if this whorl was dropped or someone tried to force it in the distant past, but the one track is almost completely crumbled. This could prevent the track from holding the driveband properly. The second track is stil sturdy.

The bobbin is in excellent shape:

The flyer shaft is also in excellent shape, straight and only some minimal surface rust on the orifice.

If I were going to spin for extended periods of time on this flyer, I would have it replaced. The shaft is in excellent condition, so a new flyer could be built using the old shaft. This repair costs around $70 to $100. A new whorl is approximately $30 to $50. Many spinners like additional bobbins, and these typically cost around $30-35. To replace this flyer, a spinner  looking at an additional $125 to $150, plus the cost of any new bobbins, over the initial price of the wheel.

As such, this wheel was fairly priced at $100 in an estate sale. To bring it up to spinning condition, with replicated parts and a good cleaning, the buyer would have to invest another $200, bringing the total investment in this particular wheel up to $300.


Anatomy of a Spinning Wheel

July 24, 2012

First, I must apologize for my absence but a pinched nerve in my right arm prevented me from typing, working on the computer, or doing just about anything. It is on the mend, however, so I take up where I left off …

Judging by the number of hits my article on pricing an antique spinning wheel has gotten, there are a number of people out there looking to buy or sell an antique wheel. I’ve received a number of comments from readers asking for visuals. In this first of a series of articles outlining the various parts of a spinning wheel, we will first look at the overall wheel.


This is the photograph of a little American-made Saxony wheel in my collection. She is one of the few complete wheels I’ve found, having even the 3 distaff sections and an unbroken “bird cage.”

The bird cage distaff was used to hold flax for spinning into linen thread. Cage styles vary; some wheels hold instead a tow fork. While the presence or absence of the disfaff does not affect the spinability of a wheel, it is nice to find one with a complete distaff. They do make spinning flax easier!

The distaff fits into a hole at the end of the bench or table. Nearby is the mother-of-all. The mother of all is mounted on a piece that inserts into the bench and is held in place by a long wooden screw. This screw is necessary for a working wheel, as this is how the wheel is tensioned. The screw should turn freely, although some are pegged into place. DO NOT force a tension screw with its retaining peg in place as this could split the screw. Tensioning screws are not easy to replicate and are costly replacements.

The mother-of-all holds two uprights, or maidens. The maidens in turn each have a leather bearing that supports the ends of the flyer. The orifice end of the flyer faces the spinner and should not be rusted or have sharp edges. The flyer holds the bobbin and the whorl on its shaft. As noted in my earlier article, a missing flyer can be a huge deal breaker. This is the business end of the wheel, where you spin your fiber. A replacement flyer will cost upwards of $200. A broken or damaged flyer can be equally costly to replace. If you are pricing a wheel and it is missing its flyer, be fair. A spinning wheel without its flyer is a car without a transmission. You are going no where in a hurry.

At the other end of the  bench are two uprights which hold the drive wheel. The wheel should have all its spokes and its axle and axle crank should be in place. The axle should be firm and not moving in the wheel hub. The footman connects the axle crank to the treadle and can be wood, metal, or string. It is not a fatal flaw to be missing a footman; these can easily be replicated.

Legs should be firmly in place and not drop out when the wheel is moved, although sometimes they need a shim of glove leather to keep them snug. The treadle should stay in place between the front legs.

This is the basic anatomy of a spinning wheel. In another post, I will look at each section individually.

UP NEXT: The Flyer, Bobbin, and Whorl.


After Action Review: Maryland Sheep & Wool

May 7, 2012

Uh oh. Here come the flood of roving pictures.

Let’s start with one. Which of my two fiber friends will get the Polwarth and silk blend?


Pricing an Antique Spinning Wheel

April 12, 2012

Antique spinning wheels can be much more than primitive country décor.  For a handspinner, they make excellent options to buying a modern wheel. However, a lack of knowledge leads to overpriced wheels that lanquish in antique stores or on Ebay and Craigslist. Learning what to look for in an antique wheel results in fairly priced wheels that quickly find new homes with handspinners who return them to a useful life.

The first thing to consider is the style of the wheel and what it was used for. Handspinners wince or laugh when they see a great wheel listed as a “flax wheel” or a skein winder listed as a spinning wheel. They will groan when the price is so unaffordable as to be outlandish. Fortunately, the internet is a convenient source of information and a quick Google search can provide guidance for a seller or new handspinner in determining what a wheel actually is, the type of fiber spun on it, and a fair price range.

At a very high level, there are two basic wheel styles – the bench wheel and the upright wheel. Bench wheels include the great or walking wheel and the smaller Saxony, the style of which most people equate to the stereotypical spinning wheel. Upright or parlor wheels have their drive wheel above, below, or behind the flyer, instead of on opposite ends of a bench. These wheels, also called travelling wheels, were designed to take up less space and be more portable than the bench or great wheels.

Bench wheels come in varying styles other than the aforementioned Saxony, including the split or straight bench style of some Norwegian wheels or the so-called “slanty” wheel with its steeply pitched bench. These wheels typically are treadle driven. The great or walking wheel has no treadle; the spinner stands to spin the flat-rimmed drive wheel. These wheels spin fiber off of a spindle tip, as opposed to the flyer assembly on a treadle-driven wheel.

Great wheels are also known as “wool wheels,” as this was the principle fiber spun on this style. Treadle wheels with a very small orifice were typically used for spinning flax. The larger treadle wheels with cast iron tensioning and treadle were designed to be wool wheels, although any fiber can be spun on them.

Finding an antique wheel is not too difficult; finding one that spins can be a challenge. To a spinner, the most annoying Craigslist posting is the one that pictures a wheel, obviously missing key parts, yet boasting a caption that says, “It works!”  When questioned, most sellers will innocently say they believe the wheel works because “…it goes around.” Unfortunately, there is much more to a workable spinning wheel.

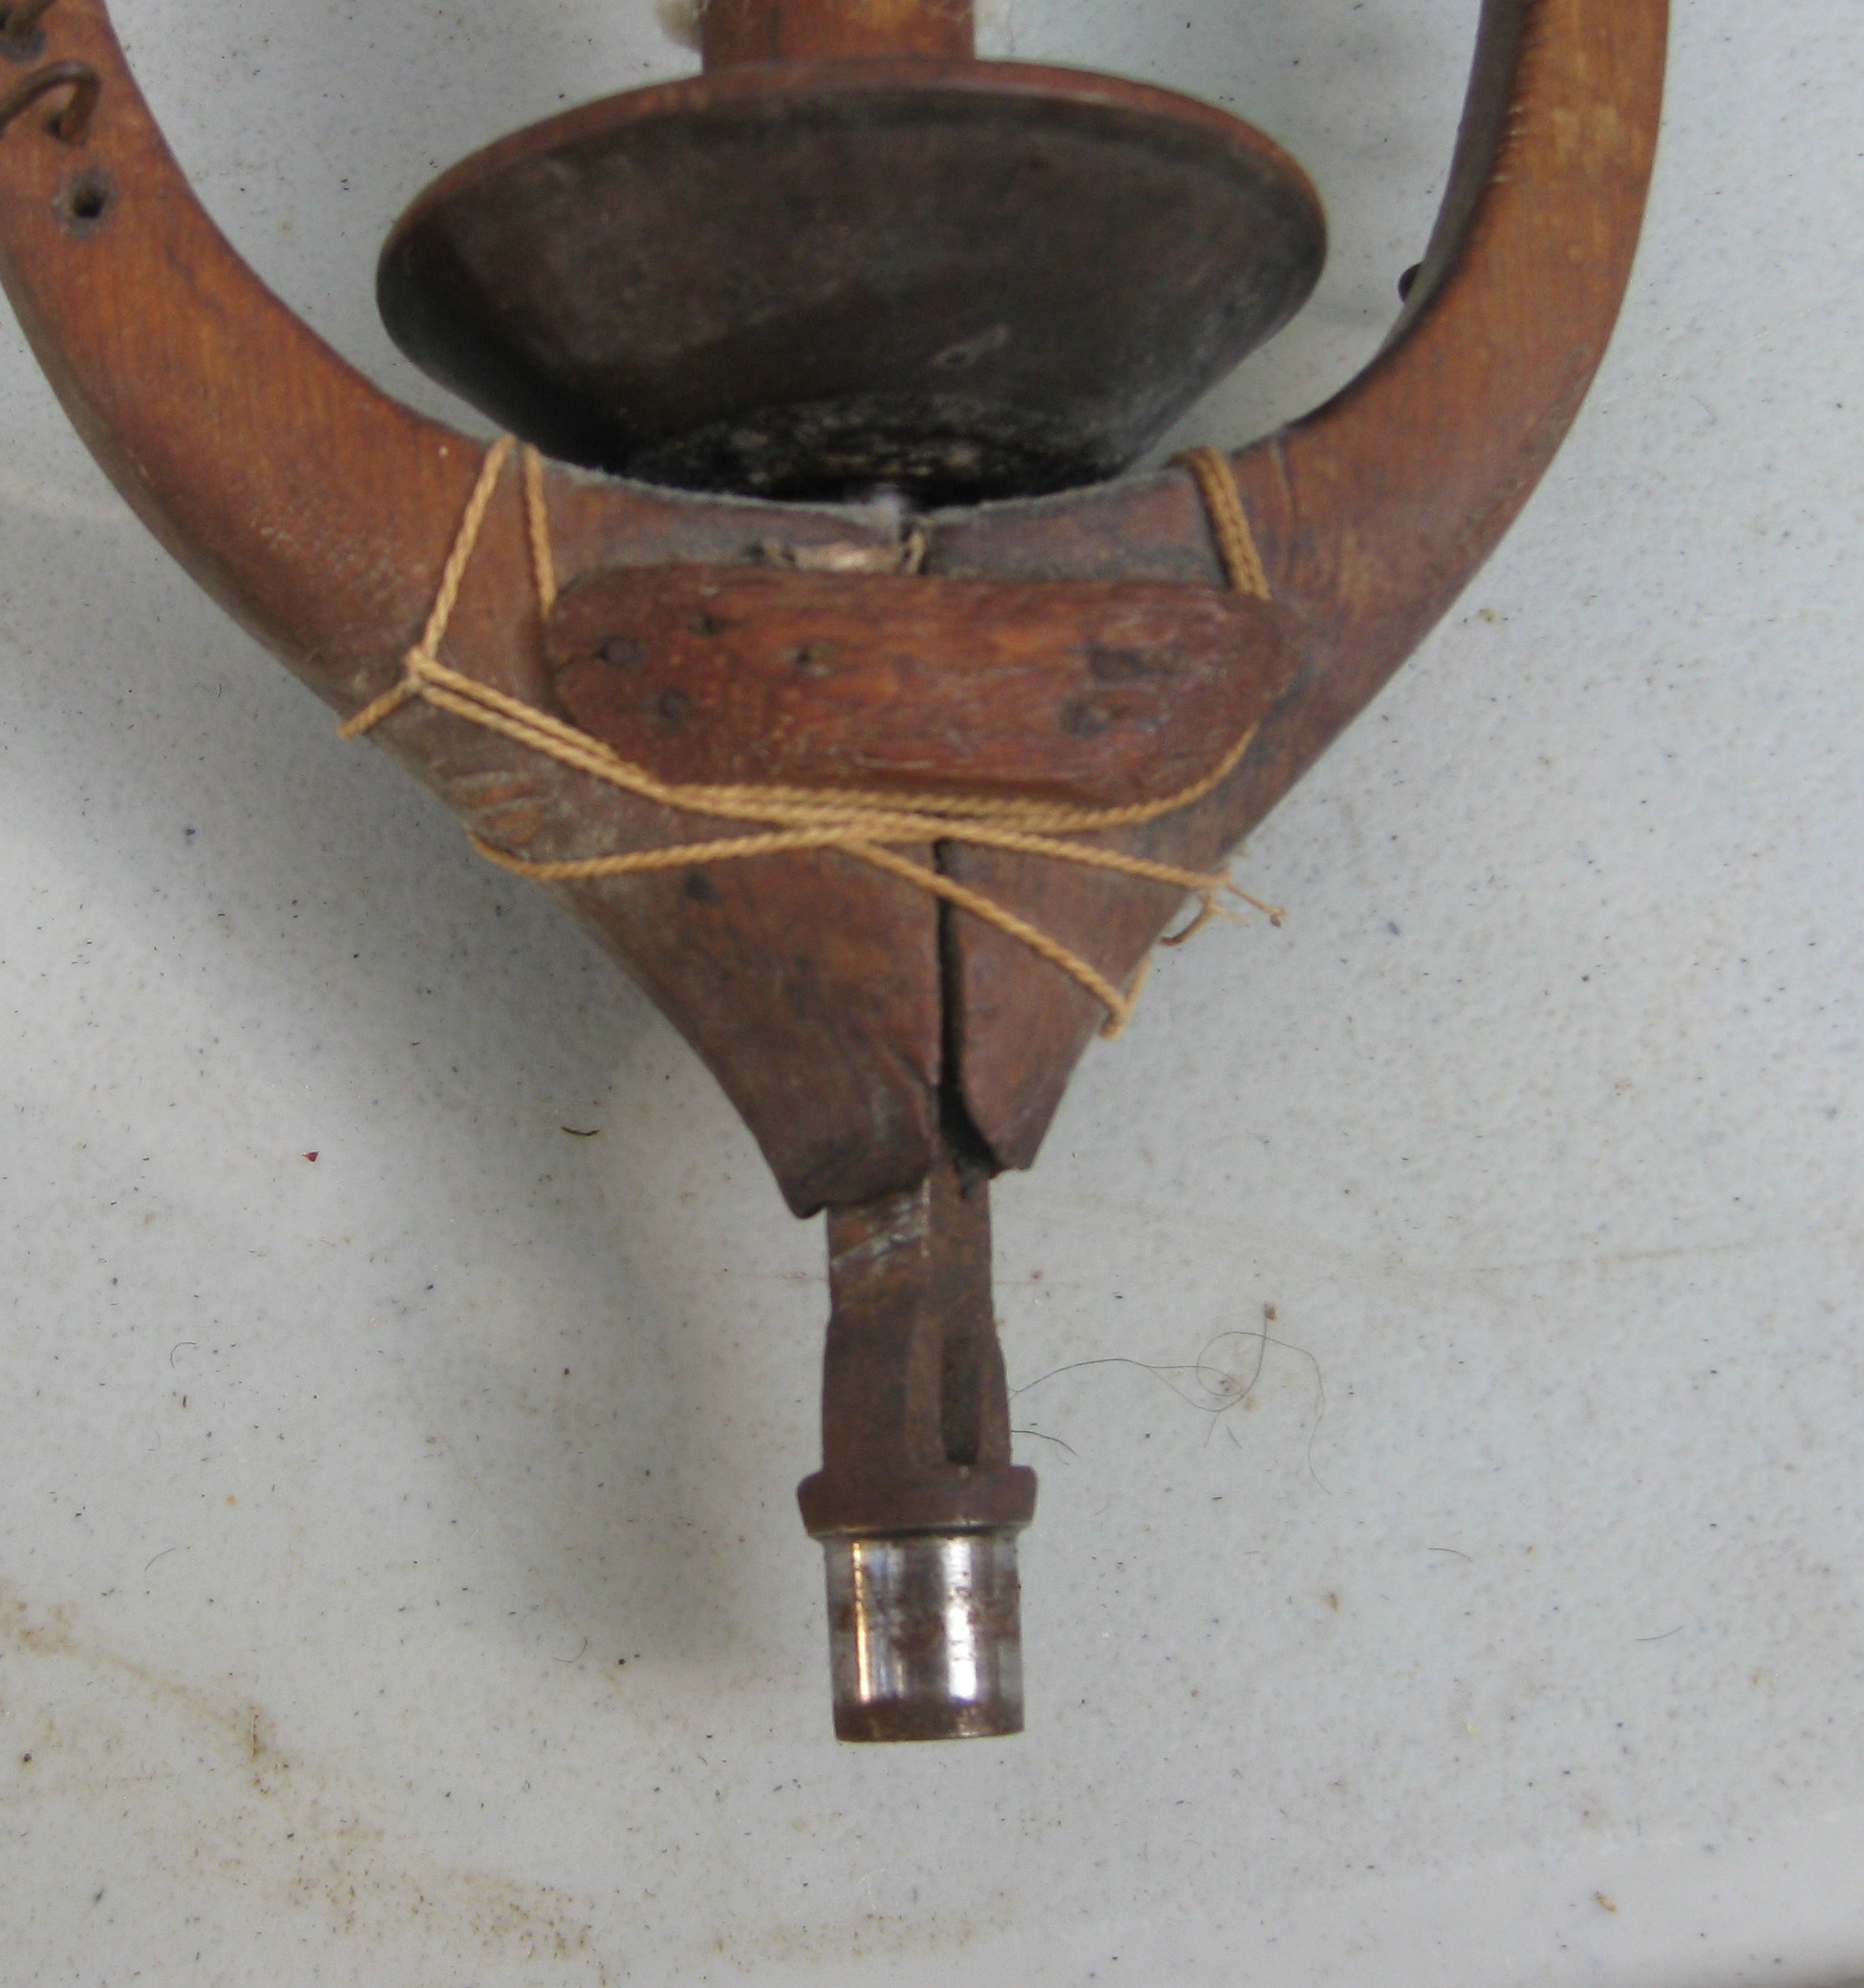
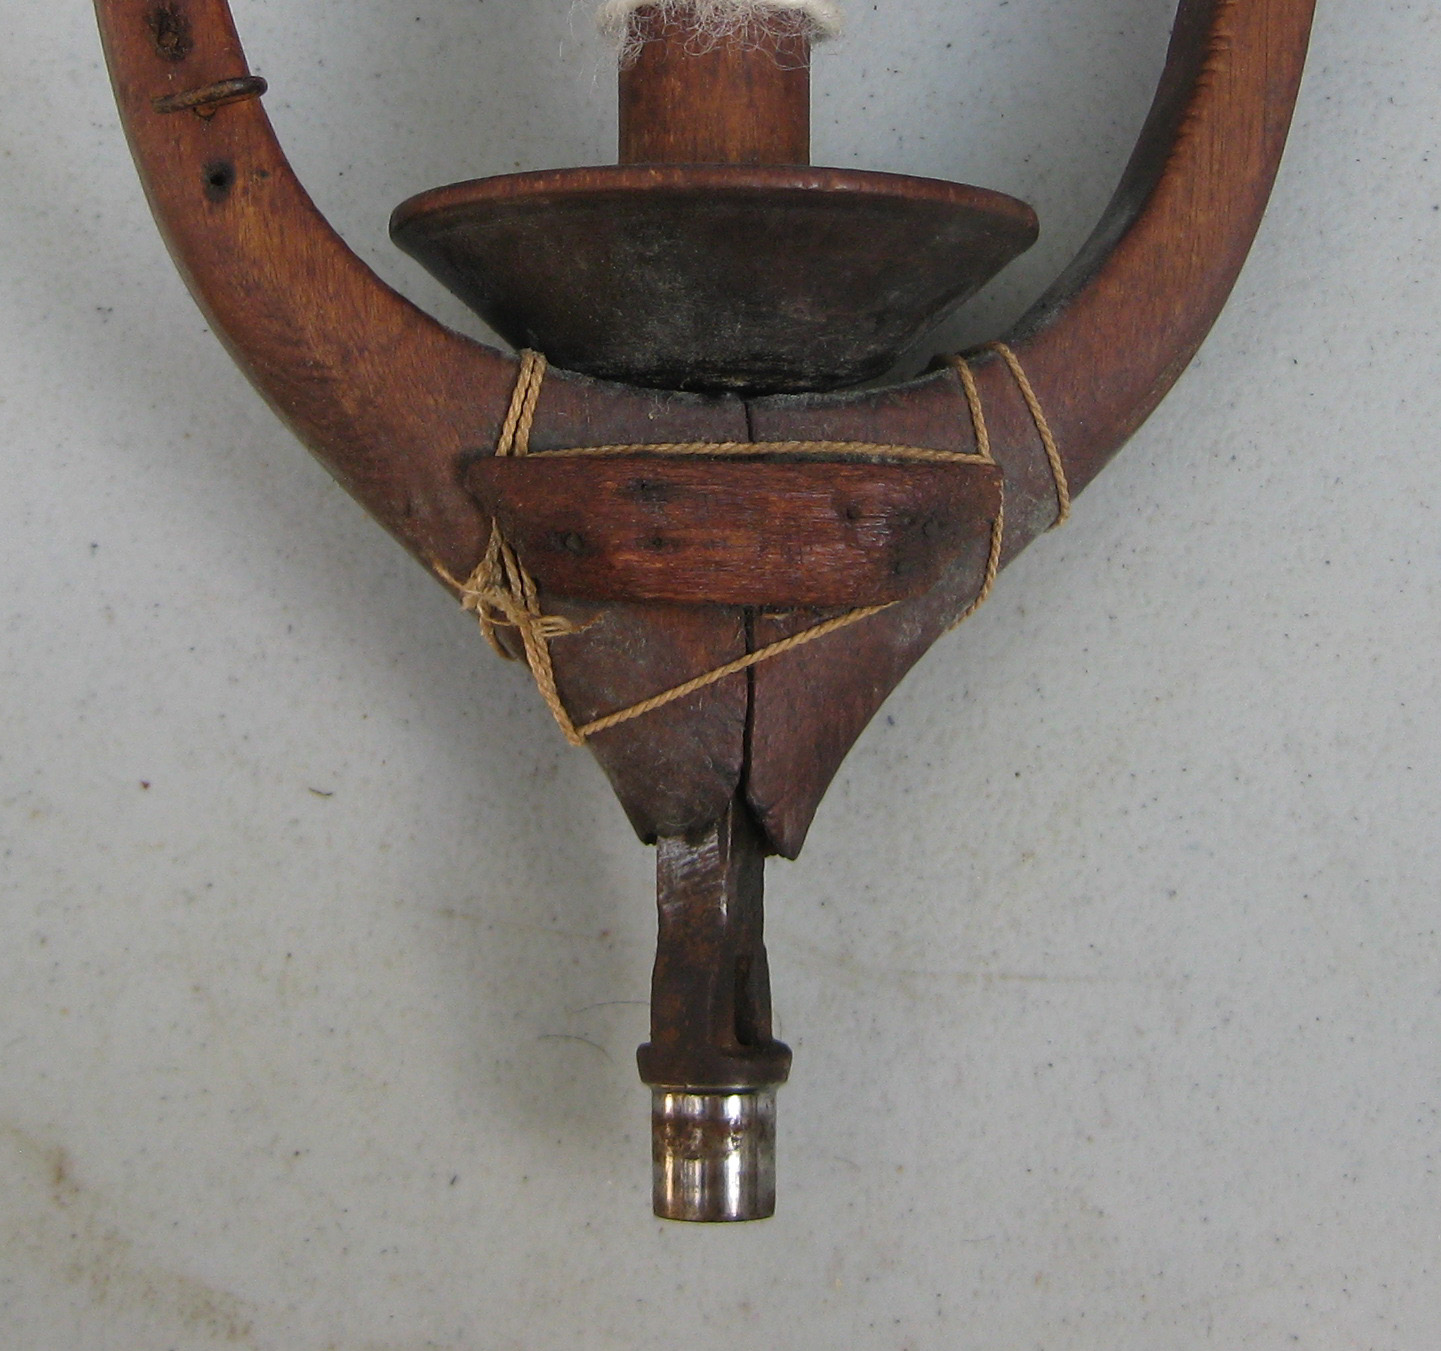
No matter the style, the wheel’s price should be dictated primarily by the presence and condition of its original parts. These may be categorized as:  the flyer assembly and mother-of-all (MOA), the drive wheel, and the overall body structure.

The flyer assembly and MOA sit at the opposite end of the bench from the drive wheel. This includes 1.) the tensioning screw or tilt tension mechanism, 2.) the MOA, 3.) the maidens (the uprights that support the flyer), and 4.) an assembly consisting of the flyer, bobbin, and whorl. These parts are among the most expensive to repair or replace, so a considerable percentage of the purchase price is centered here.

The wooden knob at the end of the bench is attached to a long wooden screw-turned shaft. This shaft screws through the center of the MOA mount. The screw should turn easily and move the mount forwards or backwards. This aids in tensioning the wheel’s driveband for spinning. Before turning the tensioning knob, inspect the bench top for a small peg that might be inserted alongside the tensioning screw. This is a retaining pin to prevent the tensioning screw from slipping; it should be tapped out from the bench’s underside to prevent splitting or stripping the wooden screw. A tensioning screw that is damaged or missing can be a fatal flaw, as it is nearly impossible to turn a new one with threads to match the MOA threading.

Wheels from the latter half of the 19th and early 20th century, particularly those manufactured in Canada, introduced “tilt tensioning.” Typically made of cast iron, but often as simple as a U-bolt or carriage bolt, a tilt tensioning system allowed the spinner to adjust the driveband tension by loosening or tightening a wing nut to tilt the MOA backwards or forwards.

The MOA itself should be sturdy, with no wobbles. The threaded base for the tensioning screw fits tightly into the MOA base; the MOA crossbar should fit snugly on the base. A MOA that is loose or falling apart will not support the flyer assembly for spinning. Cost to repair the MOA using existing pieces typically costs between $50 and $100, depending on the severity of the problem. Lathing new parts would add to this cost.

The maidens consist of wooden uprights with leather bearings that support the flyer assembly. Maidens should fit snugly in the MOA crossbar. The front maiden, the one that supports the flyer orifice, should turn relatively easily towards the spinner to allow for release of the flyer. Maidens that are very loose may be shimmed with a small piece of glove leather. Damaged or missing bearings are easily replaced with tooling leather or even a section of old belt. Cracks or chips should not interfere with spinning ability. Missing maidens can be replaced by a competent wood turner, but this will drive up the end cost of the wheel.

The flyer assembly, consisting of the flyer, bobbin, and whorl, accounts for possibly the largest percentage of your purchase price. The flyer is the “business end” of the spinning wheel; it is where the fiber is spun into yarn and it is what winds the finished yarn onto the bobbin. The whorl and bobbin may be chipped, but must be present for the assembly to be considered complete. A flyer that is obviously not the original will also decrease the wheel’s value.

A missing flyer assembly will cost upwards of $200 to replace. The metal flyer shaft is costly to replace, as it requires a craftsman with a metal lathe to turn a new one. A flyer that is missing an arm, shows evidence of an old mend, or has missing or rusted hooks is worth less than a flyer in pristine condition. If the metal shaft is present, the flyer and hooks can be replaced at less cost than having the whole assembly remade; typically, it should cost under $100 to replace just a broken flyer using its own metal shaft.

An existing but mended flyer should be evaluated carefully. The pressure of the drive band and momentum of spinning put a tremendous strain on the flyer. Spinners related stories of flyers losing an arm in mid-spin, creating a dangerous projectile that can travel fast enough to dent wallboard. A clumsily repaired flyer will need to be rebuilt to make it safe for spinning.

The bobbin is a wooden tube with end caps that fits over the flyer shaft. One end of the bobbin should be rounded, or have a plain wooden disc, that faces the wooden flyer. The top of the bobbin should have either a groove around the edge of the end disk, or a secondary disk on top. This holds the driveband in place around the bobbin.

The whorl is a single- or double-grooved wooden disk that typically screws onto the flyer shaft or, with some European wheels, has a friction fit. WARNING: be very careful when attempting to unscrew a whorl. They often are threaded in the opposite direction from modern threading and will not tolerate much pressure in unscrewing. A stubborn whorl will disintegrate into wood chips when forced. A few drops of WD40, given time to sink in, usually coaxes a stubborn whorl to unscrew. The whorl holds the second loop of the drive band in place on a double drive wheel. It should be relatively free of chips and cracks, and the center screw piece should not turn independently of the wood.

A great wheel has a spindle rather than a flyer assembly. The MOA and maidens support a long metal spindle, typically with a wooden whorl on its shaft and possible a wooden or leather disc to prevent fiber from winding on past a certain point. A more advanced set-up includes a large whorl known as a “minor’s head”; this is an accelerating device that mounts on the top of the MOA and acts as a second wheel to turn the spindle faster. Replacing the entire MOA, spindle and miner’s head can cost over $100, so evaluate carefully.

At the opposite end of the spinning wheel bench, the drive wheel represents another large percentage of the wheel’s price. The drive wheel should be true and turn without warp or wobble. It should have all its spokes. The axle crank should fit snugly through the center of the wheel hub and should not turn independently of the wheel. The hub should be free of cracks, as should the wheel rim. The wheel rim may have expansion joints and these might have small spaces in between each; these spaces are not fatal flaws, as they allow for the wood to expand and contract with heat or cold. However, should the joins be cracked, sprung, splintered, or glued, these could all affect its ability to spin smoothly. The drive wheel should also line up with the flyer’s whorl and bobbin.

The bench should be carefully inspected for flaws or old repairs. It should be structurally sound; a hairline fracture could indicate a potentially splitting problem. The legs should fit snugly; inspect them to see if they are pegged or nailed into place. A wooden peg may have been inserted by the maker, but a nail or worse, a screw, might indicate a leg that kept falling out.

Uprights should likewise fit snugly and should not be split or broken where the drive wheel is inserted. Metal, or sometimes bone, bearings should be present to support the wheel axle and prevent its wearing against the wood. A small hole in the rear of the upright may indicate a missing secondary support, although not all wheels carried these.

The bench should be inspected for holes and marks. Holes in the bench could indicate a missing distaff, reeling pin, or orifice hook. Maker’s marks were often stamped in the end grain of the bench or stenciled on top.

Pricing a wheel can be tricky, especially for those uninitiated in spinning wheels. A wheel that is broken or missing major parts should typically cost under $100, depending on the severity of damage. A wheel in spinning condition with all its working parts could run anywhere between $100 and $200, depending on the style, the maker, and the condition. A wheel with minimal damage but in “barn-fresh” condition will be worth less than one that has been cleaned and restored to a pristine finish. A wheel with its original pristine finish will be worth even more.

Generally, a buyer on the East Coast can find a nice wheel that requires minimal restoration in the $100 to $200 range, including great wheels. Common wheels that turn up priced in the thousands are unrealistic. Good references such as the books by Joan Cummer, Patricia Baines, or Pennington & Taylor will provide a more realistic view of what a wheel is worth, given its condition and availability. Some wheel styles are less common in other areas of the country and this could affect pricing, but not so steeply that the wheel becomes unaffordable.

A true “working” wheel needs to have much more than just a drive wheel that turns. It needs an undamaged, unwarped drive wheel that sits smoothly in its uprights. It requires a structurally sound body and legs. Most importantly, it requires a complete flyer assembly and tensioning system, or spindle in the case of a great wheel, with a minimum of cracks and flaws. A wheel needs to be evaluated based on missing or broken parts and the availability of having these remade. Should the cost of restoration exceed the asking price of the wheel, the wheel is not fairly valued and should be repriced accordingly.